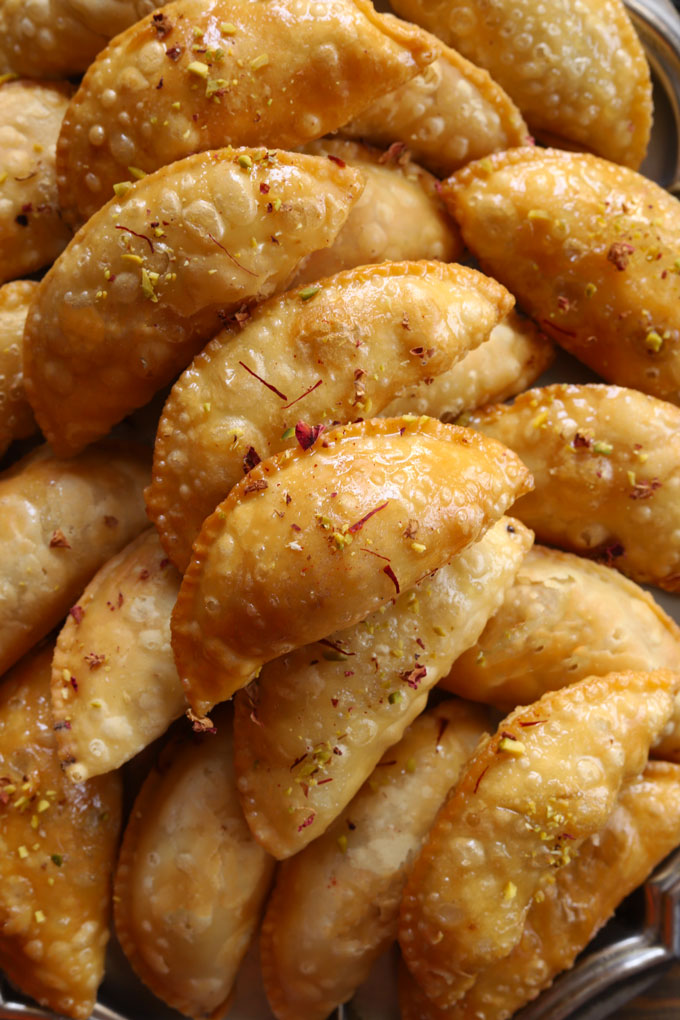
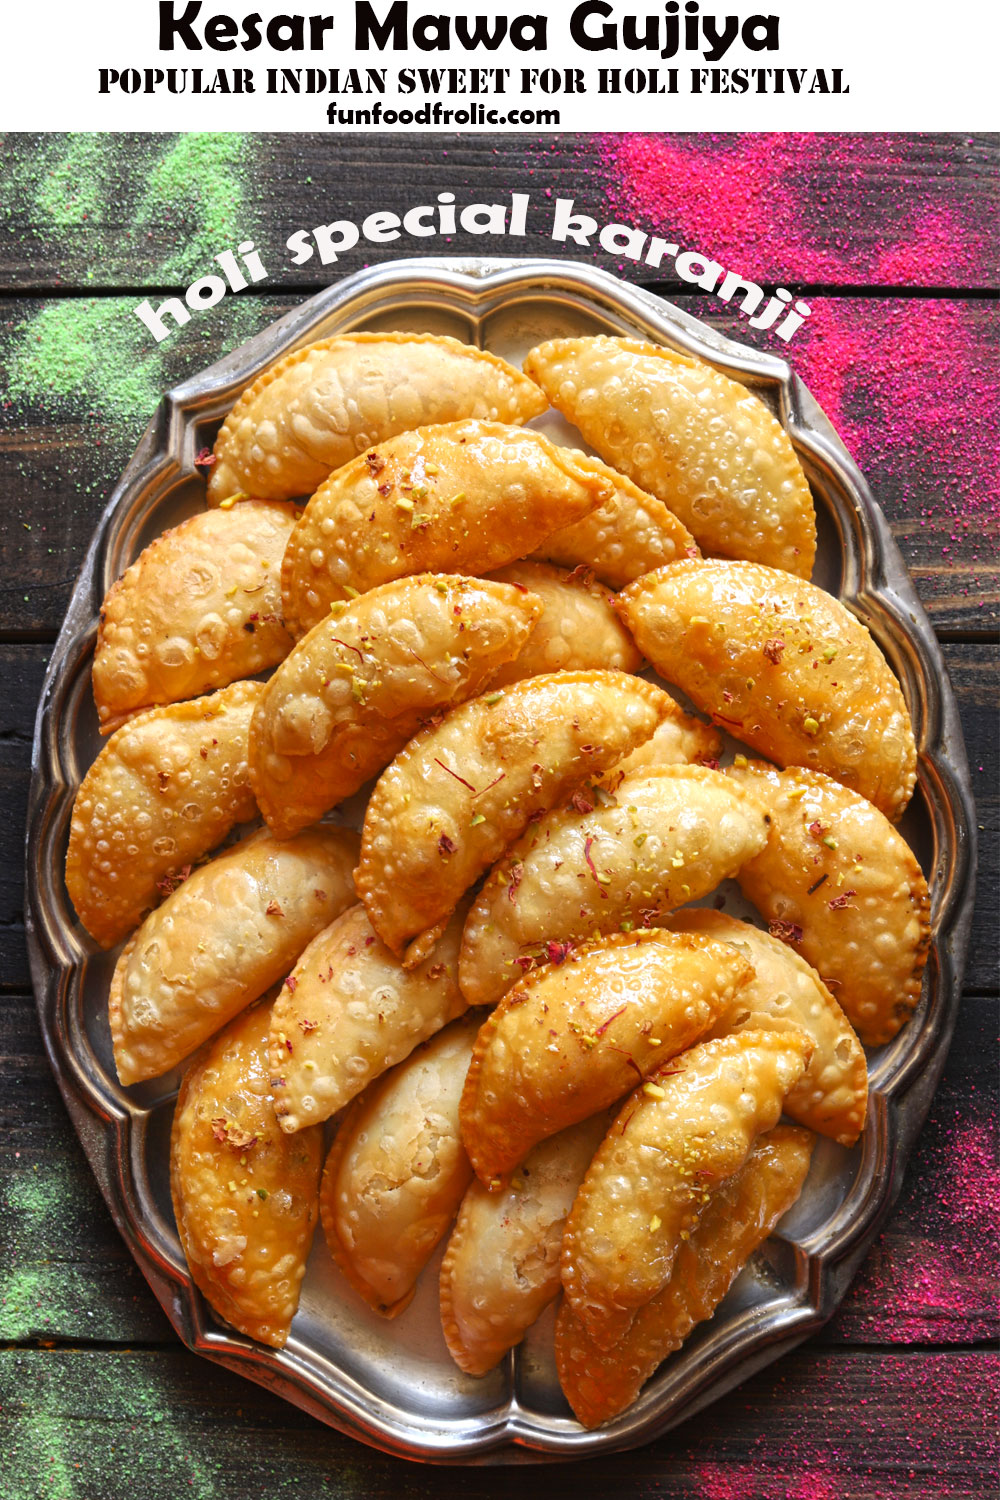
Gujiya is a traditional Indian sweet made on the festival of colours – Holi. I am sharing my family’s tried and tested North Indian Gujiya Recipe.
What is Gujiya?
Gujiya is a famous North Indian sweet made with suji or maida, stuffed with a sweet mixture of khoya (mawa) and dried fruits. It’s traditionally deep-fried and has a crisp and flaky texture.
It is also known as Ghughra in Gujarat, Karanji in Maharashtra, Somas in Tamil Nadu, Garijalu in Telangana, and, Kajjikaya in Andhra Pradesh and Karnataka, with each region having its gujiya recipe.
Gujja and Thandai are the two essential food items to make on the occasion of Holi. If you are thinking about what other dishes to make for Holi, follow my Holi Party Guide.

Ingredients Required
The outer pastry cover for ghujia requires only three ingredients:
- Maida
- Ghee
- Water.
For the stuffing, you need the following:
- khoya (mawa)
- Dry fruits (almonds, raisins, pistachio, chironji)
- Desiccated Coconut
- Powdered Sugar
- Saffron
Essential Equipment: You need a casting mould to shape and seal the ghujia. You can easily pick one online or at the nearest supermarket. You may not require the mould if you are a pro, like my mom, at shaping/sealing the pastry with your fingers.
How To Make
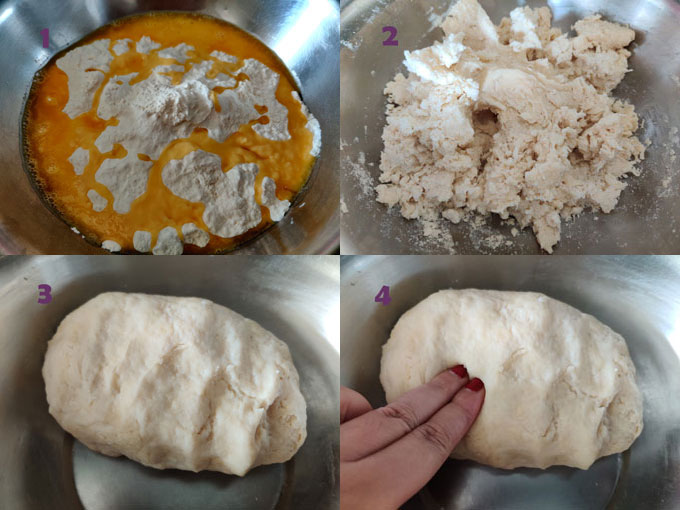
Step 1) First, make the pastry dough (follow step-by-step instructions as shown in the image below) and allow it to rest.
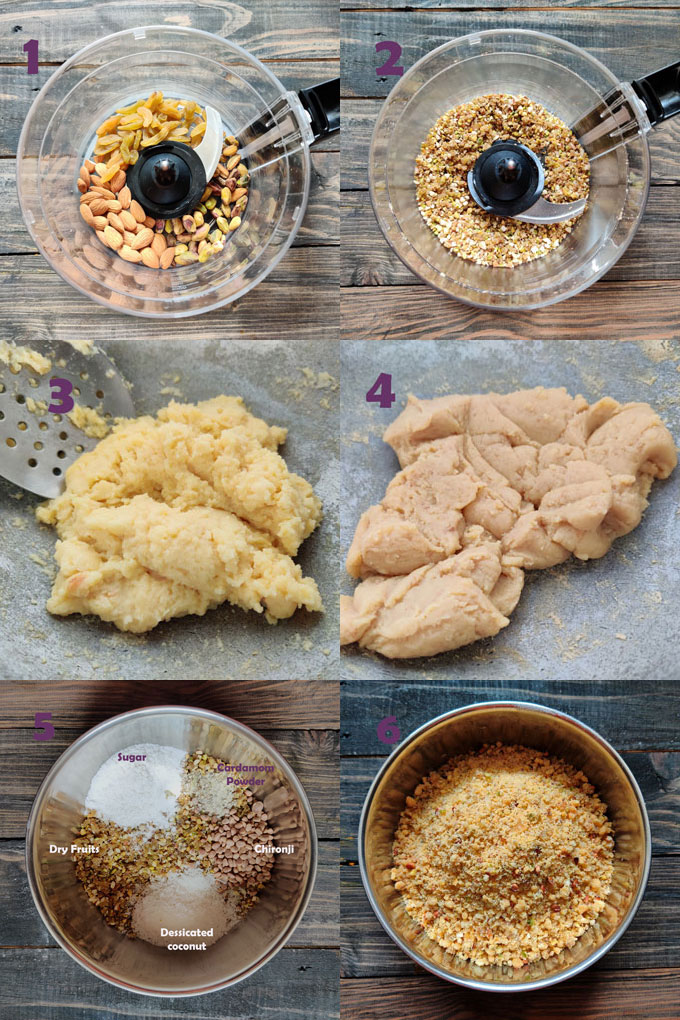
Step 2) Second, prepare the sweet khoya (mawa) and dry fruit mixture for the stuffing (as shown in the image below).
Allow it to cool down completely.
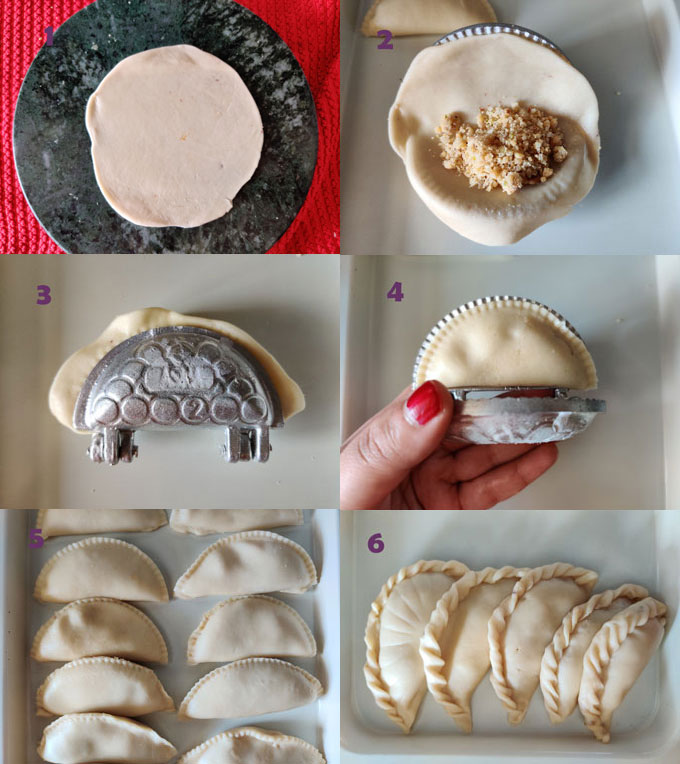
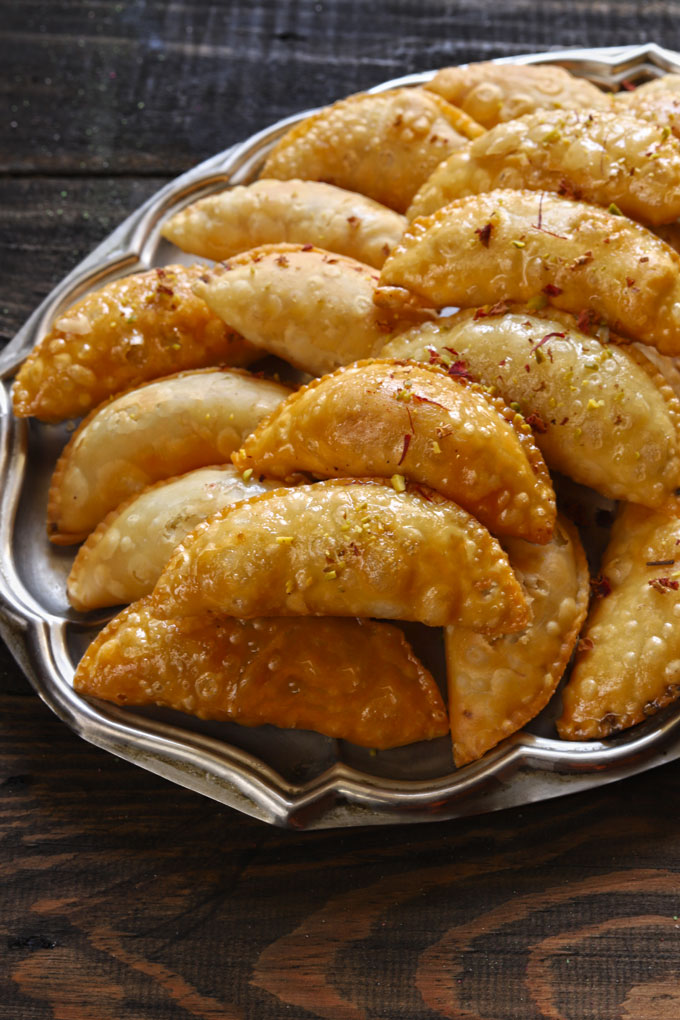
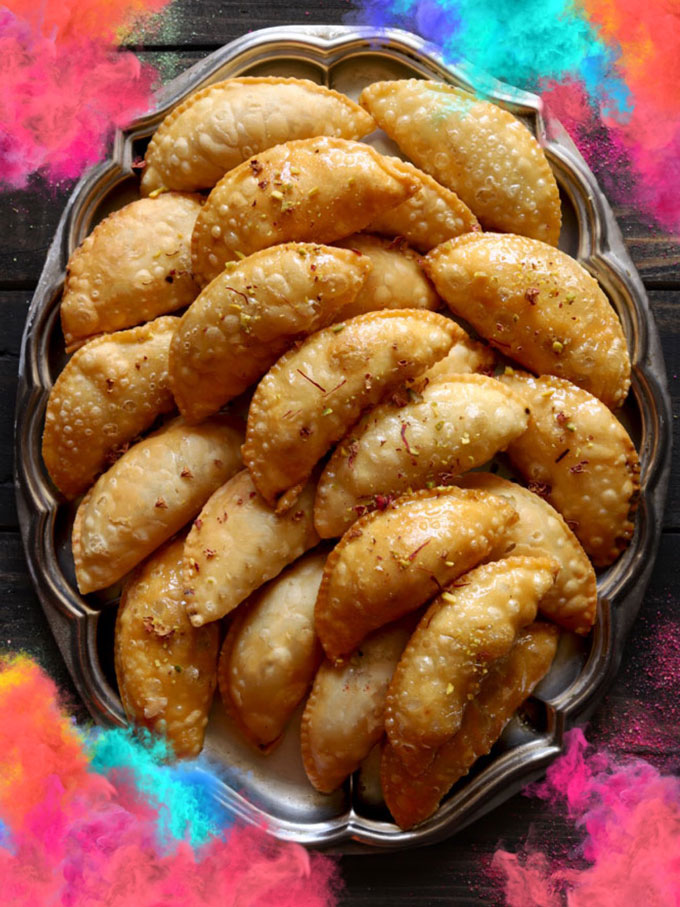
Step 3) Third, shape all the ghujia and arrange them on the platter in a single layer.
You can shape them using a readymade casting mould or manually (as shown in image 6).
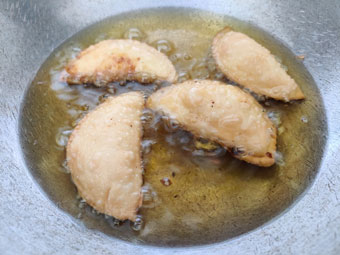
Step 4) Deep fry the ghujia in small batches in the hot oil until crisp and lightly golden.

My Tried & True Tips
Dough: The pastry dough should be slightly stiff.
Perform a texture test, press two fingers into the dough, the perfect dough should be a little tough to push and should not stick to your fingers.
Cover the dough with a moist muslin cloth, and allow it to rest at room temperature while preparing the stuffing.
Stuffing: Allow the khoya mixture to cool completely before stuffing it inside the pastry. Taste while preparing the stuffing and adjust the amount of sugar accordingly.
Feel free to use a combination of dry fruits, semolina (rava), desiccated coconut, nuts, and khoya to make the stuffing.
Sealing/Shaping: Do not overstuff the pastry layer with the khoya mixture. Else, ghujia might tear while frying.
After stuffing, make sure gujiya are sealed tightly. Apply little water to seal and secure the edges. If not sealed tightly, the stuffing will spill into the oil while frying.
Cover all the shaped ghujia with a moist cloth before frying, or the outer dough layer will become dry.
Frying: Always fry ghujia in medium-hot oil over low heat. Keep on moderating the heat while frying. But never fry ghujia on high heat. They might burn and remain uncooked from the inside.
Fry ghujiya in small batches. Do not overcrowd the pan.
Storing: Transfer fried/baked gujiya to a metal colander or a wire rack. Allow to cool down completely. It should not be hot or warm to the touch while storing.
Store ghujia in an airtight container. Do not press them too hard while storing them, as the outer layer of the pastry might break apart.
FAQs Related To Gujiya Recipe
Yes, absolutely. The making process remains the same, to bake, preheat the oven to 180 degrees Celcius. Grease a baking tray with a tablespoon of ghee and place the Gujiyas on the tray in a single layer. Brush each ghujia with ghee.
Bake for 12 – 15 minutes at 180 degrees Celcius. The outer layer of the pastry should be crisp, flaky, and light brown. Transfer baked ghujia to a wire rack to cool down completely before storing.
Gujiya’s are best enjoyed hot and fresh. However, you can store mawa gujiya for one week at room temperature. If your Gujjiya is coconut-filled, they can stay longer, up to 2 weeks at room temperature, if stored in an airtight container. Once the Gujjiya’s are deep-fried, take them out on a plate or metal colander and let them cool completely before storing them in an airtight container else; they might crumble.
More Indian Sweet Recipes
- Jalebi
- Atta Ladoo
- Mawa Barfi
- Carrot Halwa
- Besan Laddo
- Gulab Jamun
- Moong Dal Halwa
- Kesar Mawa Modak
- Instant Coconut Laddo
follow us on Instagram or Youtube for video recipes.
If you try this recipe and love it, please leave a comment and a rating. This helps us grow and reach other food lovers like you.
Mawa Gujiya Recipe (Karanji)
- Deep Frying Pan
- Gujiya Casting Mould
- Rolling Pin
Ingredients
Ingredients for the dough
- 500 gram all-purpose flour (maida)
- ⅓ Cup Ghee
- Water to bind the dough
Ingredients for the filling
- 400 gram unsweetened khoya (mawa/khova/evaporated milk)
- 2 tablespoon ghee
- ¼ Cup desiccated unsweetened coconut
- ¼ Cup golden raisins (kish mish)
- ¼ Cup chironji (charoli)
- ¼ Cup almonds
- ¼ Cup unsalted pistachio
- ½ Cup powdered sugar or to taste
- 1 teaspoon green cardamom powder (elaichi powder)
- 1 teaspoon saffron strands
For the glaze
- 2 Cups water
- 1 Cup sugar
Other Ingredients:
- Water to seal the Ghujias
- refined oil or ghee for deep frying
Instructions
Prepare the dough:
- For the dough, rub flour and ghee between your fingers for the next 5 – 6 minutes. Do not skip this step.
- Adding ¼ cup water at time bind dough. The dough should be firm to touch. Knead it for 5 minutes. Perform dimple test (see recipe notes). Cover the dough with a wet muslin cloth and set aside.

Prepare Filling:
- To make the filling, in heavy-bottomed pan heat ghee on medium heat, add grated khoya and turn the flame to low.
- On low flame stirring occasionally let mawa turn into light golden in color. At this stage, mawa will leave its own ghee and start leaving sides of the pan (refer to the step-by-step images above). Turn off the gas and set aside until it cools down.
- Meanwhile, in a food processor blend raisins, pistachio, and almond to a coarse powder. You should feel the graininess of the dry fruits. Do not make a fine powder.

- Once mawa cools down, mix in sugar, coconut, dry fruits mixture, chironji, cardamom powder, and saffron. Mix nicely and crumble the chunks of roasted khoya.
- The ghujia stuffing should resemble a coarse powder with all the ingredients mixed nicely (refer step-by-step stuffing image above).
Shape Gujiya:
- For making ghujias, knead the dough once again for a minute or so.
- Divide the dough into about 50 equal sized small balls. Roll each ball into about 4 to 3 inch diameter (like a poori).
- Place the rolled dough into gujia mould. Dip your finger in the water and spread it around the edges of the rolled dough.

- Put about 1 tablespoons of the filling mixture in the center and fold it into a semi-circle along with the mold, press firmly. Make sure the edges are completely sealed otherwise they will open while frying and oil will get in and filling will come out.
- Remove the excess dough and continue filling the rest of the gujia in the same manner.
Fry Gujiya:
- Heat about 1-½ inches of oil in a heavy bottomed frying pan on medium heat. To test if the oil is hot enough, drop a small piece of dough into the oil. It should sizzle right away but come to the surface slowly.
- Place the gujia in the frying pan 3 – 4 at a time. After gujiyas are floating on top of the oil, turn them slowly. Fry the gujias until they turn light golden-brown color on all sides. Don’t fry on high heat; the gujia crust will be too soft and not crispy.
- Frying each batch of gujiya takes 10 – 12 minutes. So do not rush this process. And keep turning them while frying at regular intervals for even cooking and coloring.
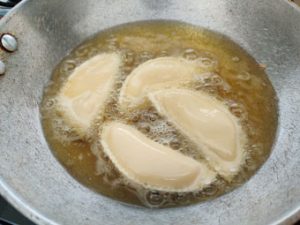
- When they are done cooking, lift them out of the oil with a slotted spoon and drain on an absorbent paper.
Glaze Ghujia:
- For making glaze, boil water and sugar in a pan until sugar dissolves and syrup is slightly thickened and sticky.
- Dip in ghujias in the sugar syrup and and remove on a plate.
- Let the ghujias cool completely before storing it in an airtight container.
- Serve kesar mawa gujiya warm or at room temperature.
Recipe Notes:
- Dimple Test: Perform a texture test on the dough, press two finger into the dough, the perfect dough should be a little tough to push and should not stick to your fingers.
- Allow khoya to cool down completely before mixing with other ingredients. It should not be warm to touch and easy to handle.
- Taste while preparing the stuffing and adjust the amount of sugar accordingly. Do not add too much sugar at once.
- Do not overstuff the gujiya with the khoya mixture else it might tear while frying.
- After stuffing, make sure gujiya are sealed tightly. Apply little water to seal and secure the edges. If not sealed tightly, the stuffing will spill into the oil while frying.
- Cover all the shaped ghujia with a moist muslin cloth before frying or the outer dough layer will become dry.
- Always fry ghujia in a medium-hot oil over low heat. Keep on moderating the heat while frying. But never ever fry ghujia on high heat. They might burn and remain uncooked from inside.
Nutrition


Pankti Mehta says
Great recipe and I love the way you take pics 🙂
Namrota says
I am going to make this asap… this is my favorite sweet.
Seeta says
Yummy! I dont have a sweet tooth as such but will try these for the husband 🙂
Shiju Sugunan says
Lovely pictures as always. We made this too.
Harish says
Very delicious 😋🤤
Thanks for sharing this
Healthy Food Care